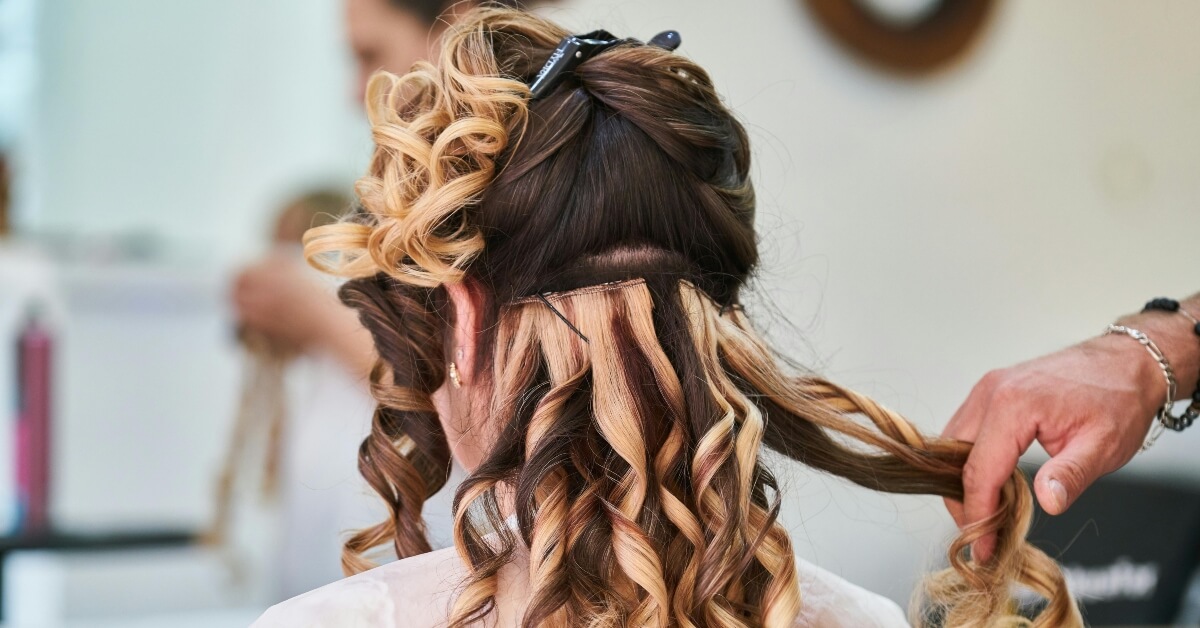
Root smudging has become the go-to solution for women who want seamless, low-maintenance hair color that grows out gracefully. This technique creates that coveted “lived-in” look you see on celebrities and Instagram influencers.
Whether you’re dealing with stubborn grays, harsh highlight lines, or just want to extend time between salon visits, this comprehensive guide will walk you through everything you need to know about root smudging. We’ll cover the science behind why it works, how to customize the technique for your specific hair type, and when it makes sense to DIY versus seeing a professional.
If you need help with your roots, schedule an appointment with the experienced stylists at Societe Salon. We are committed to delivering exceptional hair to all our clients, day in and day out.
What is Root Smudging? Going Beyond the Basics
Share this infographic:
Root smudging is a technique of hair coloring that gives a soft, subtle blend between your natural root color and the balance of your hair. It is a root filter. It smooths the demarcation line between the point where your natural color leaves off and your colored hair takes up, creating a silky transition that is simply natural.
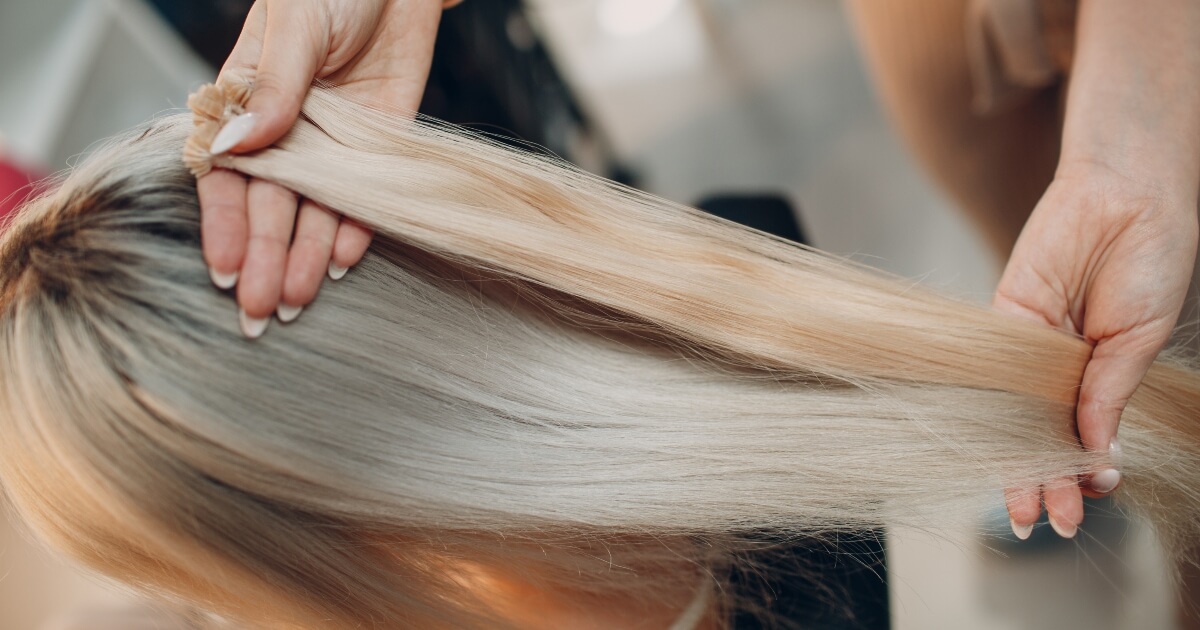
The technique is simply to paint a shade 1-2 shades darker than your base color onto the root area, then feather it down 2-3 inches. This creates what colorists call a “shadow” effect that replicates how your hair would naturally grow with some root regrowth.
Why is root smudging so in vogue?
Stars like Jennifer Lopez, Blake Lively and Margot Robbie have all been spotted wearing this gloriously low-maintenance look. It’s perfect for busy girls who want incredible hair with minimal hassle. The technique went crazy on social media because it photographs well. It adds natural-looking depth and dimension to hair that doesn’t appear flat or overdone.
Who Can Benefit Most From This Technique?
- Those with highlighted or lightened hair and want to soften regrowth
- Anyone wanting to add more time between color appointments
- Clients with fine hair who need to build visual density
- Those needing to move out of an all-over color into a more natural look
Root smudging is especially effective if you have too-light or unnatural-looking color at the roots.
The Science of Smudging Roots
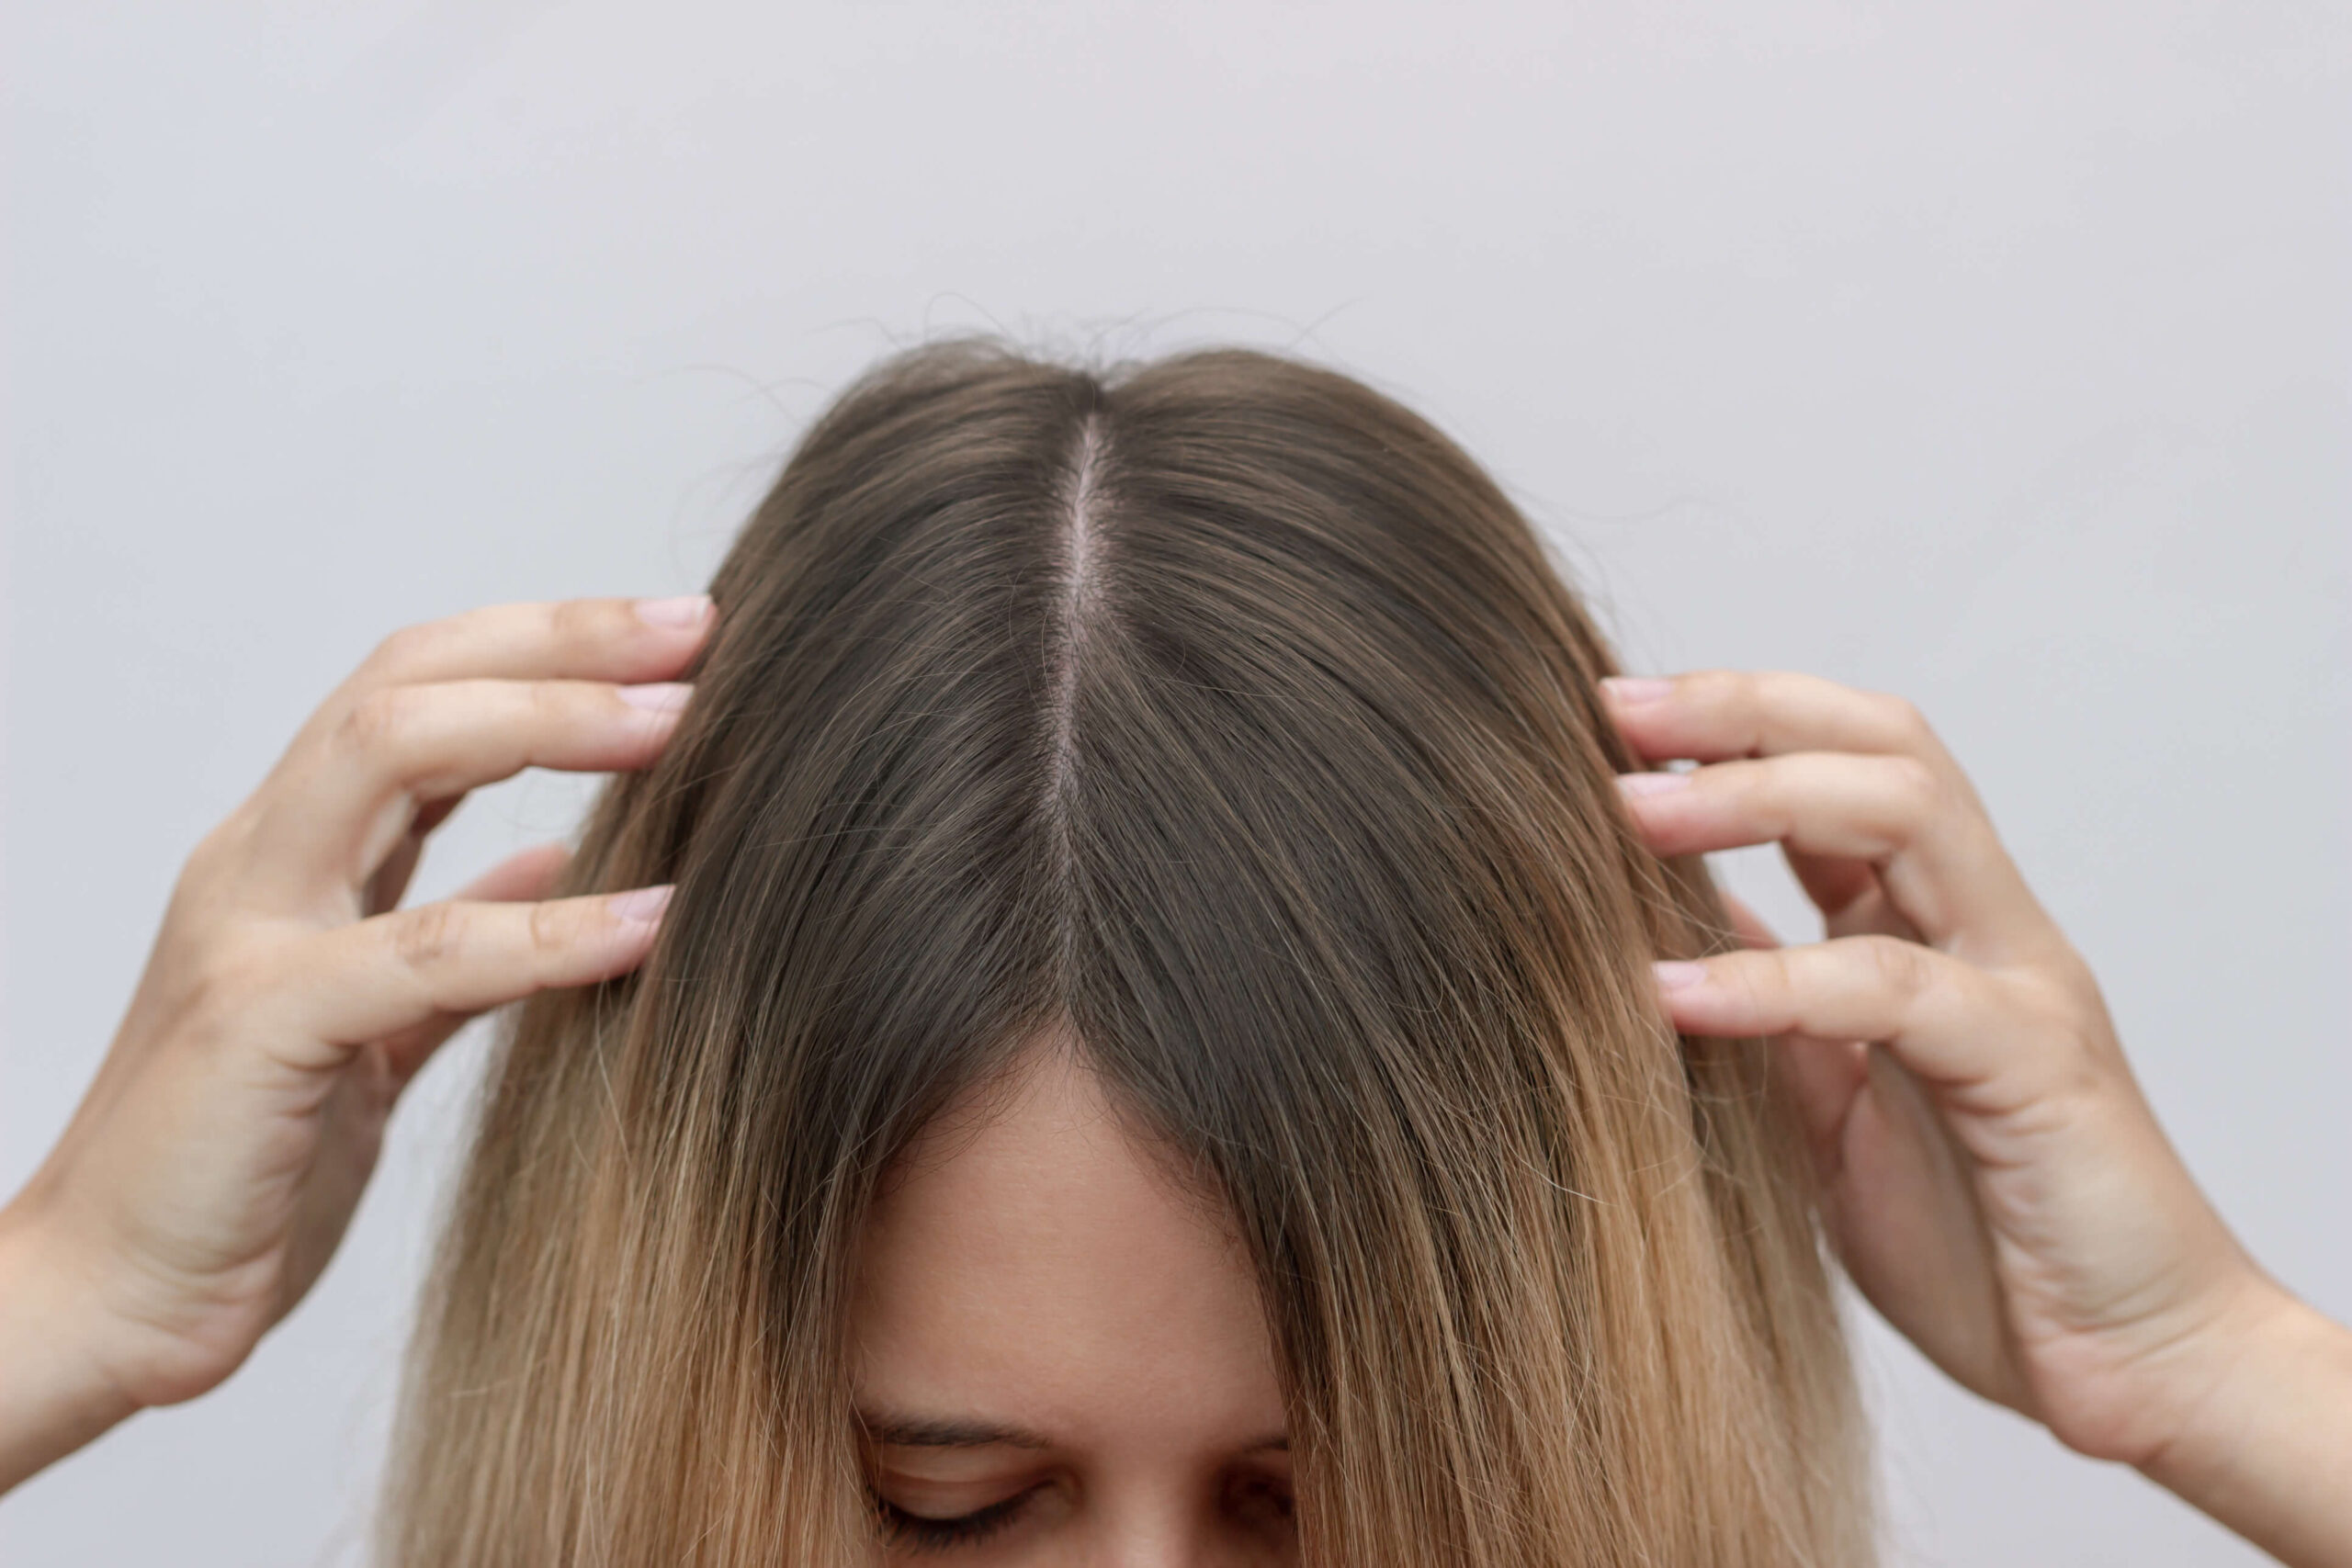
Here’s what’s happening when you get a root smudge: the method is capitalizing on your hair’s natural porosity levels. Your roots are usually the healthiest, least porous part of your hair, so they resist color alteration. Constant root touch-ups can lead to unnatural-looking demarcation because they’re trying to merge one specific shade.
Root smudging is a means of using color theory.
- Using a slightly darker, neutral shade on the roots, it gives the “anchor point” that colorists say will cause the rest of your hair color to look more solid.
- The darkened roots also create the illusion of depth, causing fine hair to look thicker and all hair to look more dimensional.
Hair porosity is just one of the major reasons why this technique works so well. Your hair’s ends and mid-lengths become more porous with heat styling, environmental stress and previous chemical procedures. This makes them absorb and hold color differently than your virgin roots. Root smudging accounts for this by using formulas that harmoniously match the natural porosity patterns of your hair.
Why is this superior to the previous root touch-ups?
Previous techniques try to produce perfect color matches, which look flat and noticeable as they grow out. Root smudging creates intentional variation that mimics the way hair naturally lightens and darkens, so growth will look incremental instead of jarring.
Root Smudging vs. Your Other Options: A Complete Comparison
Knowing your options enables you to make the most advantageous decision for your hair goals and life. This is how root smudging compares to other popular root techniques:
Root Smudge vs. Standard Root Touch-up:
- Root smudge offers subtle blending; touch-ups offer accurate color matching
- Smudging 8-12 weeks; touch-ups need to be updated every 4-6 weeks
Root Smudge vs. Shadow Root
- Both create darker roots, but the shadow root uses your natural color
- Root smudge can be blended with different tones; shadow root is your natural color
- Shadow root lasts 12-16 weeks longer but with less color choice
Root Smudge vs. Root Melt:
- Root melt blends multiple colors seamlessly; root smudge focuses on the root area specifically
- Melts require more processing time and skill; smudging is quicker and more straightforward
Choose root smudging when you want low-maintenance color that grows out gracefully, don’t mind slightly darker roots, and want to extend time between appointments without looking obviously grown out.
Mastering Root Color Techniques: Know Your Options
Root Smudge: The Gentle Gradient
Root smudging creates the most natural-looking transition between your roots and the rest of your hair. The process involves applying a semi-permanent or demi-permanent color that’s 1-2 levels darker than your base color, focusing on the first 2-3 inches from your scalp.
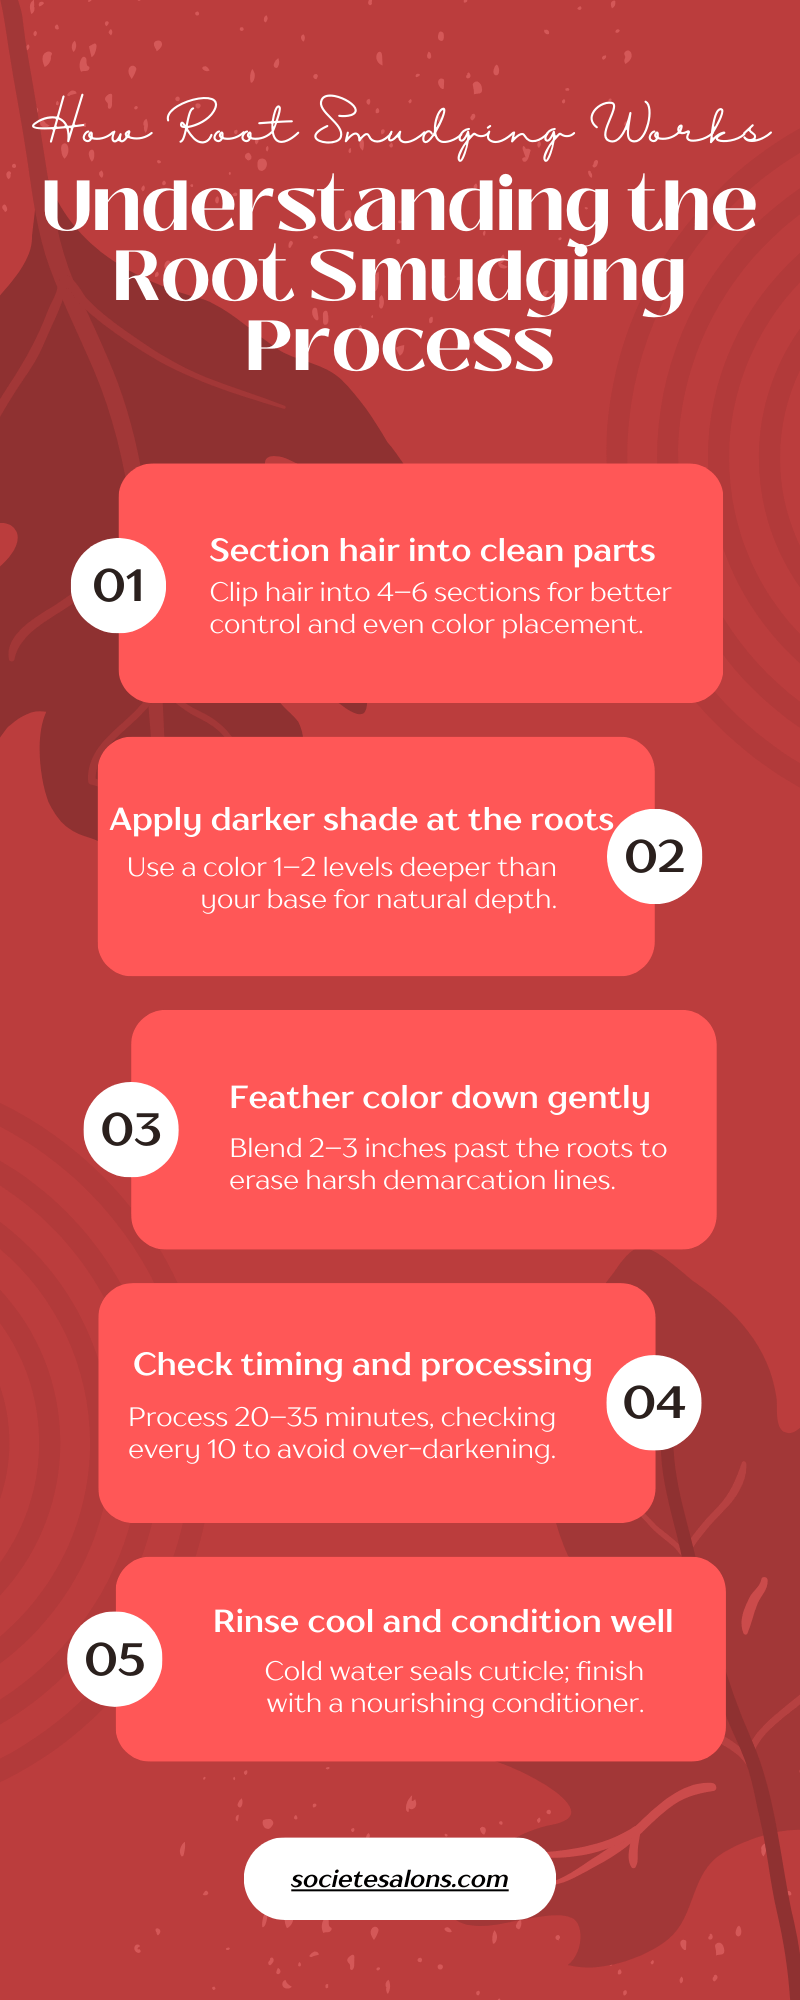
The detailed process starts with sectioning your hair into manageable parts. Your colorist (or you, if you’re going DIY) applies the smudging color using a brush or applicator, working it through just the root area. The key is in the blending technique. The color gets “smudged” or feathered down to create that soft transition.
Best Hair Types for Root Smudging:
- Fine to medium hair textures respond beautifully
- Works excellently on highlighted or balayaged hair
- Ideal for natural bases from light brown to dark blonde
- Perfect for anyone with 25% gray coverage or less
Root smudging works especially well if your current color feels too light or lacks dimension. It’s also the gentlest option since it typically uses lower-volume developers or deposit-only formulas.
Shadow Root: Creating Depth and Dimension
Shadow root differs from smudging as it uses your actual natural root color rather than a custom mix. Think of it as embracing your natural color and getting it to blend flawlessly with your lightened lengths.
How it Differs From Smudging:
Shadow root is a precise replica of your natural color, while root smudging might change the tone so that it blends in with your overall color scheme. Shadow root also covers three to four inches from the root.
If you want the perfect shadow effect, your colorist will need to analyze your natural color level and undertones. Your colorist will mix a color that perfectly matches your roots, then apply it to create a natural shadow look. The application requires color-matching and blending technique to avoid visible lines.
Shadow root is perfect for women who love their natural color, but want to maintain lighter ends. It’s particularly great if you have dark, warm natural colors that look great with lightened hair.
Root Melt: Seamless Color Blending
Root melt is the most advanced technique, creating a seamless blend of multiple colors from root to tip. It’s like having a color gradient painted onto your hair – no harsh lines anywhere, just beautiful transitions.
Breakdown of advanced technique: Root melt involves the use of multiple colors at varying locations on the hair shaft. Your colorist will use 3-4 different formulas, each slightly lighter than the previous one, to create a melted effect. The process requires precise sectioning and careful timing.
Professional application tips at home: Honestly, root melt is one of those techniques that are better left to the professionals. The color formulation is complex, and the application requires high-level skill. If you are going to try it at home, start with two colors maximum and practice the blending technique on a hidden area first.
Root melt is ideal for dramatic color changes or if you want to get the ultimate lived-in color that doesn’t need a lot of maintenance.
Root Tap: Precise Color Placement
Root tap (or root tapping) is a spot-treating method that hits areas rather than achieving an overall effect. Think of it as strategic color placement where you need it the most.
- Spot-correction method: Your colorist chooses specific areas – maybe where your natural color is showing through more heavily, or where highlights are too light – and applies targeted color only to those areas. It’s like putting concealer on your hair color.
- When precision matters most: Root tap is perfect when you don’t need overall color correction, just tactical ones. It’s also fantastic for correcting hot roots (when root color takes too light) or for tweaking uneven fading.
It’s an economical and time-saving method when you only need subtle adjustments rather than an overall color refresh.
Choosing Your Perfect Technique: A Decision Matrix

Your lifestyle, hair type, and maintenance preferences should be your guide. Here’s how to choose:
Consider your hair type first:
- Fine hair: Root smudge creates the most visual density
- Thick, coarse hair: Shadow root or root melt work better for full coverage
- Curly hair: Root smudge is gentlest and works with your natural texture
Lifestyle and maintenance style:
- Ultra-low maintenance: Shadow root (longest lasting)
- Some maintenance okay: Root smudge (good balance)
- Don’t mind regular touch-ups: Root tap (most precise)
Budget and time constraints:
- Tightest budget: Root tap (isolated problems only)
- Medium budget: Root smudge (best value for coverage)
- Higher budget for best results: Root melt (most extensive)
Most women like that root smudging offers the best balance of natural-looking results, acceptable maintenance, and value.
Your Hair Type Does Matter: Root Smudging Personalization
Fine Hair: Reducing Damage While Adding Depth
You must provide even more TLC to your fine hair with any coloring procedure. Your hair is finer and more prone to over-processing, but smudging root areas can make the fine hair look thicker by providing a visual heaviness at the roots.
Fine hair application methods:
- 10 or 20 volume developer at most to prevent damage
- Thin sections to saturate but not over-saturate
- Process for shorter periods and check every 10 minutes
- Use olaplex or other bond-building treatments during and after coloring
Product recommendations for breakage-prone hair: Look for demi-permanent color rather than permanent color. Redken Shades EQ, Wella Color Touch, or L’Oreal Dia Light are a few lines that are designed to be less harsh on your hair while still providing good color. They do deposit color and will not lift your natural color, which means less damage.
The key to styling fine hair is patience. Multiple light applications are better than trying to achieve your desired outcome in one session. Your hair will thank you for the extra TLC, and the results will last longer when your hair is healthy.
Thick/Coarse Hair: Even Coverage
Thick, coarse hair presents issues of its own – mainly getting the color to penetrate evenly and cover all the hair. Your hair’s natural thickness can be an issue if application is not methodical.
Sectioning methods that do work:
Section your hair into at least 8-10 sections, and make them 1/4 to 1/2 inch wide in horizontal sections. It might sound like an overkill, but it is the only way to ensure each strand is covered. Clip up the sections and work your way up from the bottom in a systematic fashion.
Processing time adjustment:
The coarser hair generally needs more processing time as the cuticle is thicker and more Color-resistant. Process for 35-45 minutes instead of the normal 20-30 minutes. Check a strand every 10 minutes after the 25-minute mark.
Consider using a higher volume developer (20 or 30 volume) if your hair is extremely resilient, but do a strand test first. Coarse hair can withstand more intense processing, but you don’t want to damage more than is needed.
Curly and Textured Hair: Special Considerations
Textured and curly hair requires some TLC when it comes to color processing. The curl pattern will affect how color shows and how the product will move through your hair upon application.
Working with natural curl patterns:
Apply color to hair in its natural state when possible – don’t stretch or straighten it first. The color needs to work with your curl pattern, not against it. Use your fingers or a wide-tooth comb to distribute product, following your natural curl direction.
Moisture retention during coloring:
Curly hair is usually drier, and therefore one needs to retain the moisture during coloring. Use a protein-free deep conditioning treatment 3-5 days before coloring. Do not allow your hair to get too dry and brittle during coloring.
Curly hair requires additional moisture after color. Schedule weekly deep conditioning appointments for a month, followed by every other week for upkeep. Use color-treated curly hair products since they will maintain both your curl and color.
The smudge at the root technique works beautifully on curly hair since it generates natural-appearing dimension that cooperates with how light strikes curls differently along your hair.
The Professional Root Smudging Process: Step-by-Step Expertise
Pre-Color Prep: Preparing Yourself for Success
Good preparation is what will differentiate good results from great results. Your hair’s background and condition will directly affect how it will take new color, so this is not a step to be overlooked.
Hair health test starts with an honest observation of your hair’s current condition.
Run your fingers through your hair – is it brittle, dry, or too soft (a possible indication of damage)? Look for split ends, breakage, or thinning spots. If your hair is damaged, get protein or moisturizing treatments for 2-3 weeks before coloring.
Color history evaluation is crucial to predict results. Write down all of the chemical treatments you’ve had in the past year – colors, highlights, perms, relaxers, even clarifying shampoos. Old color can interact with new color in unexpected ways, especially if there is a trace of metallic dye from box color.
Patch testing importance cannot be stressed enough, especially if you are trying a new formula or brand. Mix a small amount of your chosen color and place it behind your ear or on the inside of your wrist 48 hours before your color session. This will test for allergic reactions and give you a sense of how the color will look on your hair.
Also, perform a strand test on a hidden section of hair. This shows you exactly how your hair will respond to the color and processing time.
Color Selection Science: Discovering Your Ideal Match
Getting the color selection just right is where science blends with artistry. The wrong pick can leave your hair looking muddy, brassy, or even downright unnatural.
Knowledge of undertones is the key to proper color choice. Your natural hair possesses undertones – warm (gold, orange, red) or cool (ash, blue, violet). Your root smudge color should harmonize with these undertones, not conflict with them. Bring various color swatches to your roots in daylight to determine which colors blend with your natural tones.
Seasonal influences are more significant than you might think. Your skin color does shift to some extent with exposure to sunlight, and different lighting conditions during a year affect how your hair color appears. Winter needs slightly deeper, darker colors, and summer can afford brighter or golden colors.
Skin tone compatibility is your final test.
- Peach, golden, or yellow undertones to the skin tend to go well with warm shades of hair.
- Pink, red, or blue undertones to the skin are enhanced by cooler hair shades.
- Neutral skin shades can usually handle both, but still look most natural if the hair color is a bit towards their dominant undertone.
Try out your color selection by draping fabrics of various colors close to your face – the ones that give your complexion a healthy, red look determine the direction for your hair color.
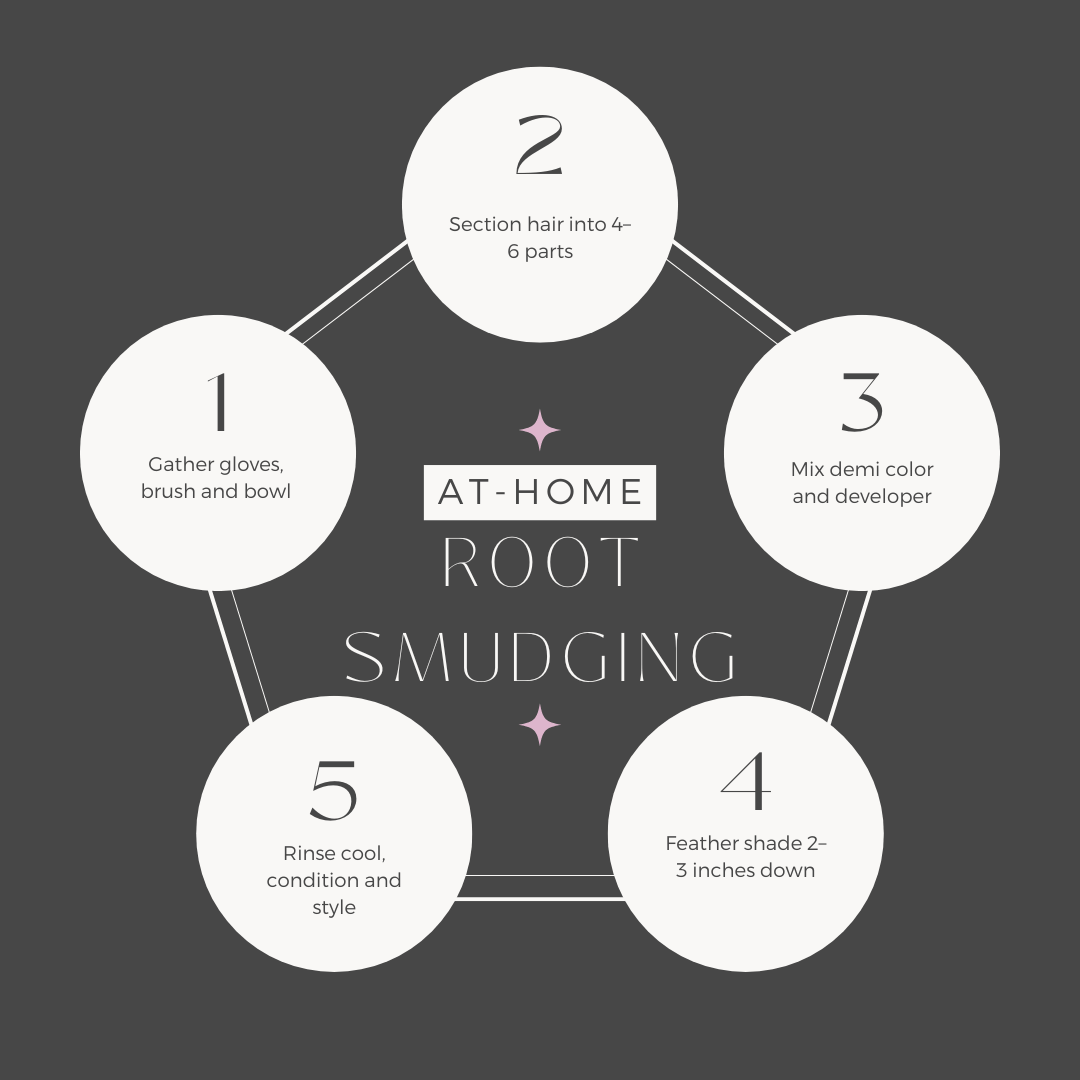
Application Technique: Professional Style at Home
The technique of application can make or break your root smudging outcome. Professional techniques are not necessarily more involved, but they’re more methodical.
Step-by-step detailed process:
Begin with clean, towel-dried hair. Section out your hair into four large sections – from the ear to the other ear horizontally, then from the forehead to the nape vertically. Clip each section in place.
Begin in the back areas, creating horizontal subsections about 1/4 inch deep. Work the root smudge color starting about 1/2 inch from your scalp, working toward the roots, and then melding down about 2-3 inches. This technique prevents the color from setting too fast on the scalp where your body heat maximizes processing.
Expert sectioning techniques: Section in a reasonable order.
- Never start at the top and section down, always start at the nape and section up to the crown.
- Section small enough to have good visibility of each individual strand.
- Use the end of a rat-tail comb to section out individual sections clearly, and re-color if you see any areas that were missed before moving on to the next section.
Timing and processing instructions: Set a timer on as soon as you’ve painted your first section. The typical root smudge processes in 20-35 minutes, but checking at 10 minutes after the brief initial 20 minutes guarantees that you get the best timing. The color needs to be dense and blended and none of the hard edges should show.
Rinse out with cold water to seal up the cuticle and preserve your color. Finish up with a color-safe conditioner to restore moisture.
Problem-Solving Basics
Even with perfect preparation, disaster can strike. Here’s what to do when the most common root smudging problems occur:
Evening out streaked application: If you notice streaked coverage when rinsing, don’t panic. Thin a small amount of the same color formula and spot-apply to the streaked area. Process 10-15 minutes, keeping an eye on it. Rushing or not sectioning small enough is the most common cause of uneven application.
Dealing with unforeseen results: If your color was darker than anticipated, wash using a clarifying shampoo right away. This may strip away some of the top color. If lighter than anticipated, you may need to reapply the same color, but at least 48 hours should pass before doing so to allow your hair to recover.
If your color is dirty or has an unwanted tone, a toning shampoo will tone out unwanted undertones. Yellow/orange tones are eliminated by purple shampoo, orange by blue shampoo, and red tones by green shampoo.
If in doubt, have a professional colorist fix it rather than trying to correct major issues yourself. In some cases, trying multiple corrections will only do more damage than the original issue.
Use the embed code to share this infographic:
Product Deep Dive: Choosing the Right Formulas
Semi-Permanent vs. Demi-Permanent: When to Use Which
Understanding the difference between these two categories of color enables you to choose the right formula for your goal and hair condition. Both are ideal for root smudging, but they yield a different benefit.
Longevity comparison: Semi-permanent colors 4-6 weeks, gradually fading with each shampoo. They’re great if you like to change your look frequently or want to test a new color without a long-term commitment. Demi-permanent colors 6-8 weeks and fade more slowly, so they’re great for low-maintenance color regimens.
Hair health issues: Semi-permanent colors are the least damaging because they contain no ammonia and no or low volume developer. They deposit color on your hair without lifting your natural color, so there is minimal damage. Demi-permanent colors have low-volume developer (usually 10 volume) that slightly opens the cuticle for greater color deposit but still causes minimal damage.
When to choose each one:
- Choose semi-permanent if you’re pregnant, your hair is damaged, or very fine
- Choose demi-permanent if you want longer-lasting results and your hair is healthy
- Semi-permanent is ideal for subtle transformations (1-2 levels darker)
- Demi-permanent can handle more intense transformations (up to 3 levels darker)
Either one is ideal for root smudging, so it depends on how long you’d like the results to last.
Developer Volumes Explained: The Science of Lift
Developer volume determines how much your hair cuticle opens and how much natural pigment is lifted. When doing root smudging, you typically want minimal lift since you are depositing darker color.
10, 20, 30, 40 volume differences:
- 10 volume: Opens cuticle slightly, deposits color with no lift. Best for going darker or matching your own level.
- 20 volume: Standard for most color services, lifts 1-2 levels depositing color. Good for root smudging when there is a need for minimal lightening.
- 30 volume: Lifts 2-3 levels, too aggressive for most root smudging applications unless your natural roots are much darker than desired.
- 40 volume: Maximum lift (3-4 levels), not frequently used for root smudging except for some correction cases.
Matching developer to desired result: For the majority of root smudging, 10 or 20 volume developer provides the most desirable result. Use 10 volume when the color you want is the same level or darker than your natural roots. Use 20 volume when you need to lighten your natural color a bit to achieve that perfect blend.
Higher volumes damage more and can create harsh lines, which defeats the purpose of root smudging’s soft, blended appearance.
Professional Product Recommendations by Hair Type
For Fine/Damaged Hair:
- Redken Shades EQ: Acidic formula that’s ultra-gentle with great coverage
- Wella Color Touch: Low-ammonia formula with conditioning agents built in
- Matrix Color Sync: Ammonia-free with ceramic microspheres for even application
For Normal/Healthy Hair:
- L’Oreal DiaRichesse: Great gray coverage with beautiful shine results
- Schwarzkopf Igora Royal: Professional level with predictable, consistent results
- Clairol Professional Beautiful Collection: Good drugstore option with decent longevity
Budget options: If the professional lines are outside the budget, attempt semi-permanent lines from beauty supply stores. Ion Color Brilliance, Arctic Fox (for fashion colors), and Clairol Natural Instincts yield good results for lower prices.
Where to purchase professional product: Sally Beauty Supply, CosmoProf, and many online retailers stock professional lines for consumers. Some lines do require a cosmetology license, but others are available to anyone. Always shop authorized retailers to ensure fresh, authentic products.
Maintenance and Longevity: Keeping Your Root Smudge Fresh
How Long Will Your Root Smudge Last?
Realistic expectations for the timeline differ based on several factors, but most root smudges continue to look fresh for 8-12 weeks. This is significantly longer than standard root touch-ups, which tend to need refreshing every 4-6 weeks.
Factors that affect longevity:
- Hair porosity: Hair with greater porosity fades faster since color molecules wash out more easily
- Shampoo frequency: Daily washing will make your color fade faster than washing every other day
- Water temperature: Warm water opens the cuticle and allows color to escape
- Product use: Sulfate-containing shampoos strip color more aggressively than sulfate-free shampoos
- Sun exposure: UV rays break down color molecules, especially in highlighted hair
- Swimming: Chlorine and salt water can both fade and alter your color tone
Your personal rate of hair growth also affects how long your root smudge looks good. Most grow hair at about 1/2 inch a month, so after 8-10 weeks, you will have about an inch of new growth showing.
Prolonging Your Color: Intelligent Care Tips
Maximum care can quite easily extend your color by 2-4 weeks, save money, and keep chemical processing to a minimum.
Color-safe care habits:
- Shampoo less often: Attempt every other day or even every third day if your hair is compatible
- Dye with cold water: Rinse at the lowest temperature your skin can handle
- Use conditioner first: On wash days, treat your lengths to conditioner before shampooing them
- Weekly deep condition: Deep condition with a moisturizing mask to keep your hair hydrated so it remains healthy and will retain color longer
- Touch-up appointment scheduling: Schedule your follow-up appointment when you still like the look of your hair, not when your hair is damaged. That usually means scheduling 8-10 weeks after your initial service. Planning ahead will make you need less work each time.
Home Care Between Visits:
- Color-depositing shampoos and conditioners to restore your color
- Hair oils on ends to prevent drying them out and making your color dull
- Root touch-up sprays when you feel like looking that much more put together for special events
- High-quality thermal protectants to protect hair from heat styling
Spending money on quality care is worth it in the long term and makes hair appear healthier.
Elevated Techniques and Emerging Applications
Seasonal Root Smudging: Reinventing Your Look
Your color can go with the season rather than against it. Integrating your root smudge strategy with the seasons keeps you current and takes advantage of evolving light.
Summer Versus Winter Color Considerations
Summer’s strong natural light can make hair color appear lighter and more golden, while winter’s soft light makes colors look deeper and cooler. Plan ahead when getting your root smudge – deeper shades slightly in summer prevent your color from looking washed out, and warmer shades in winter give richness that is enhanced by the season.
Holiday and Special Occasion Variations
Root smudging is wonderful for special occasions since it gives clean, high-end-looking color. To tie holidays together, employ deeper or more dramatic color. A deeper root smudge prior to holiday portraits creates stunning depth that photographs stunningly.
Spring requires lighter, brighter root smudges to draw out new energy. Autumn does well with richer, auburn or chocolate tones that reflect fall leaves.
Root Smudging for Color Correction
Root smudging is also wonderful at fixing previous color mistakes without extensive processing or damage. It’s generally the least damaging way to transition from an unbecoming color to a natural one.
- Correcting former color mistakes: If your former color is too light, too light, or has unwanted tones, root smudging gradually corrects these issues. Instead of trying to correct all at once, root smudging allows you to correct 2-3 sessions at a time.
- Gradual color change: Need to change from blonde to brunette? Root smudging can change you gradually without startling the system. Start with a 2-3 level darker root smudge than your present color and keep darkening it at each following session until you reach your desired color.
It is particularly good for dramatic color changes because it looks intentional in the grow-out phase rather than a horror show of grow-out.
Creative Root Smudging: Beyond Nature’s Colors
Root smudging is not only about natural color. The technique blends with fashion colors and artistic applications.
Fashion colors and root smudging: If you have pink, purple, or blue hair, smudging with a deeper darker version of the same color creates dramatic depth. A plum root smudge on purple hair or a navy blue root smudge on blue hair is chic and fashionable.
Root smudging: This can actually put an end to existing balayage or highlights by giving it a more natural base. If your highlights are too harsh or your balayage has run away in an unflattering way, a thoughtful root smudge can merge everything together beautifully.
Consider adding some tones to your base smudge – a mix of your own natural tone with slight caramel or ash undertones to blend with existing highlights. This creates the most natural mix.
Safety, Health, and When to Call in a Professional
Hair Health First: How to Care for Your Strands
Your hair’s health is always to be given top priority, no matter if you are excited to have a new color. Damaged hair does not color well and will produce disappointing results which cost lots to repair.
Pre-color treatments will greatly improve your results and hair health. If your hair is weak or waterlogged when wet, do a protein treatment 1-2 weeks prior to coloring. If your hair is dry or brittle, emphasize deep conditioning treatments instead.
Protein/moisture balance is the key to healthy color outcome. Hair requires protein and moisture, but in balance. Too much protein makes the hair hard and brittle, and too much moisture softens the hair and makes it mushy. Healthy hair is smooth and springs back when stretched.
When to wait before coloring:
- If your hair is badly damaged or can be broken by touch
- Within 2 weeks of chemical relaxers or perms
- When you experience cuts or open scalp irritations
- While or shortly after getting sick when your body is under stress
- When pregnant and don’t want to resort to chemical processing
It always yields a better color and less damage when you take the time to address your hair health first.
Red Flags: When to Use a Professional
There are some issues that are beyond DIY abilities and require a professional touch. Being sensitive to the below red flags will avoid you from making expensive mistakes or causing significant hair damage.
Professional color corrections must always be done. If you have to go more than 3 levels lighter, fix a lot of previous color mistakes, or remove black or extremely dark color, there’s too big a risk of doing serious harm to do it at home.
Severely damaged hair considerations: If your hair has already been compromised by previous chemical treatments, heat damage, or environmental damage, a professional will assess whether your hair will withstand additional processing. They can also recommend treatments to restore the health of your hair.
Chemical service timing requires professionalism to operate safely. Older perms, relaxers, or certain medications can unexpectedly interact with hair color. Professionals know how these interactions occur and can modify their process to make up for it.
Trust your instincts – if a technique or approach to styling appears to be too complicated or too dangerous for your skill level, it is well worth the money to have professional work done to safeguard your hair and achieve your look.
Cost Accounting and Professional vs. Do-It-Yourself Decision Making
The Real Price of Root Smudging
With the actual costs, you can make proper decisions about your hair coloring budget and upkeep regimen.
Salon cost breakdowns: Professional root smudging usually costs between $80-150, depending on the region you reside in and salon quality. High-end salons in major cities can cost you $200+, but salon prices in smaller towns are $60-80. The price usually includes the consultation, coloring, and styling.
DIY expense: You can smudge roots at home for $15-40 in supplies like color, developer, gloves, and application tools. But include the learning curve – you get 2-3 attempts at perfecting professional-quality results before that, and this has a cost to you out-of-pocket.
Long-term investment mindset: Proper hairdressing lasts longer and is more attractive, and typically less expensive in the long term. Professional 10-12 week root smudge vs. DIY 6-8 week one tips cost-per-wear figures on their head.
How to Decide Whether to Go Professional or Do it Yourself
Assessment of skill level must be real and honest. Think about your previous history of coloring hair, your comfort with chemical processing, and your ability to get to all parts of your head and see them. Root smudging demands smooth movement to blend in – it’s not simply a matter of applying color to your hair.
Risk vs. reward analysis:
- Home effort rewards: Cost savings, convenience, new skills
- Home attempt risks: Asymmetrical outcome, hair damage, professional repair needed
- Professional benefits: Professional color match, guaranteed result, less stress
- Professional drawbacks: More cost, time limit, choosing correct colorist
Most women find that learning to perform simple root smudge work for in-home maintenance touch-ups and reserving extensive color work for the professionals is the most attractive balance of cost savings and professional finish.
Your Root Smudging Experience: Final Steps and Parting Thoughts
You’re now prepared for all things root smudging – from the basics of the process through more advanced applications and follow-up procedures. Success relies on starting with rational expectations and keeping your hair’s health top of mind throughout the process.
Your action plan will begin with realistic assessment: measure your existing hair condition, your skill level, and your maintenance inclination. If you’re new to hair coloring, consider beginning with a salon treatment to see the process up close, then follow up in your own salon between appointments.
Have realistic expectations of your root smudging experience. As with all hair practices, patience is necessary. Your first attempt might not be salon-bling, and that’s more than fine. Focus on subtle changes as opposed to overnight perfection.
Remember that beautiful hair is also healthy hair. No color process, no matter how well done, can transform very damaged hair to its greatest advantage. Make your hair’s health your priority with proper care, frequent trimming, and appropriate treatments.
The confidence you acquire from hair color you love is worth the time and effort you put into learning these techniques. Root smudging offers the perfect combination of natural outcome and low maintenance most women’s lives can handle.
Need root smudging? Need a touch up or looking to try a new hair style? Schedule your appointment today at Societe Salon.